Side Imaging vs. Down Imaging Fish Finders

When it comes to picking the right fish finder, the decision between side imaging and down imaging often stands out as one of the most critical. Both technologies serve the same purpose—helping you locate fish and understand underwater structure—but they do it in different ways. Whether you’re jigging in deep water or scanning wide flats, understanding how each imaging system works can help you make better choices on the water. In this guide, we’ll dive deep into both imaging types, exploring their pros, cons, real-world applications, and key differences. By the end, you’ll have a clear idea of which one suits your fishing style best.
What Is Side Imaging?
Side imaging uses high-frequency sonar beams directed to the sides of your boat rather than straight down. It provides a near-photographic view of the underwater environment stretching out to either side—often up to 240 feet or more depending on your unit. This type of imaging gives you a wide, detailed view of what’s to the left and right, making it excellent for scanning large areas like flats, weed beds, submerged timber, or structure-rich banks.
How It Works:
- The transducer sends out sonar beams at an angle, sweeping both sides of the boat.
- These sonar returns are processed into detailed images showing bottom contours, structures, fish, and even shadows.
- Typically displayed in grayscale or color-coded formats for clarity.
What Is Down Imaging?
Down imaging, also known as DownScan Imaging or DownVu (depending on the brand), focuses directly beneath the boat. It gives anglers a crisp, detailed image of the water column and bottom structure right under the boat. If you’re vertical jigging, drop-shotting, or looking to get a clear picture of submerged structure in deep water, down imaging is the way to go.
How It Works:
- Emits high-frequency sonar beams straight downward in a narrow cone.
- Captures incredibly fine details, like fish arches, brush piles, and depth changes.
- Displays structures and fish almost photographically, directly under your vessel.
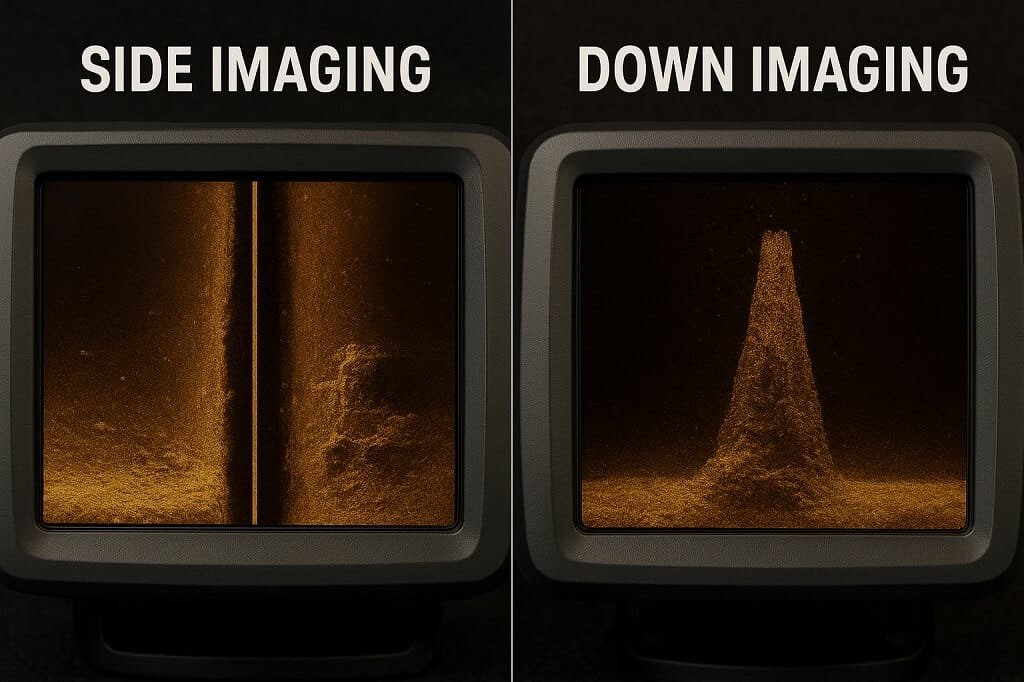
Key Differences Between Side Imaging and Down Imaging
| Feature | Side Imaging | Down Imaging |
| Coverage Area | Wide (left and right of the boat) | Narrow (directly under boat) |
| Ideal Use | Scanning large areas quickly | Inspecting specific spots in detail |
| Detail Level | High (horizontal plane) | Very High (vertical structure) |
| Depth Range | Usually less deep than down imaging | Greater depth capabilities |
| Best For | Locating structure and fish before casting | Vertical fishing and drop-offs |
Advantages of Side Imaging
- Covers More Ground: With the ability to scan large swaths of water on both sides, side imaging is perfect for scouting new water. It helps you find schools of fish, bait, or hidden structure without having to pass directly over them.
- Excellent for Structure Identification: Brush piles, rocks, submerged trees, and transition zones show up clearly. The shadows cast by these objects make it easier to gauge size and depth.
- Perfect for Shallow Water: Side imaging shines in shallow lakes, rivers, or nearshore areas. Instead of disturbing fish by passing overhead, you can scan from a distance.
- Efficient Search Tool: Use it as a wide-angle search mode before switching to down imaging or sonar for close inspection.
Disadvantages of Side Imaging
- Less Effective at Depth: Side imaging is typically optimized for depths under 100 feet. Beyond that, detail and range drop significantly.
- Learning Curve: Interpreting side imaging returns takes time and practice. Objects appear more abstract than with down imaging.
- Requires Boat Speed Control: For the best image clarity, you must maintain a steady speed—too slow or too fast can distort returns.
Advantages of Down Imaging
- Superior Detail Right Under the Boat: Down imaging offers high-resolution returns that make it easy to see fish, baitfish, rocks, and even vegetation in sharp detail.
- Ideal for Deep Water Fishing: It maintains detail and clarity even at greater depths, making it ideal for drop-offs and vertical presentations.
- Easy to Read: Down imaging typically requires less interpretation than side imaging, making it a good choice for beginners.
- Best for Vertical Presentations: If you fish vertically (ice fishing, jigging, drop shotting), down imaging shows what’s happening directly under your lure.
Disadvantages of Down Imaging
- Limited Coverage: You only see what’s directly below your transducer. This means more time is needed to cover a large area.
- Less Effective for Locating Fish Schools: Since the coverage is narrow, you could easily miss fish just a few feet to either side of your boat.
- Not as Useful in Shallow, Wide Water: In expansive shallow water, down imaging won’t help much in quickly locating fish or structure off to the side.
Real-World Application Scenarios

Shallow Lake with Submerged Timber
Side imaging is your go-to tool here. It allows you to scan both sides of the boat simultaneously, revealing the exact location and size of submerged timber without spooking nearby fish. Once you mark the timber, you can use down imaging to check the depth and shape directly below the boat. This combination helps you determine the best spots to cast or drop your bait, improving accuracy and increasing your chances of a strike.
Deep Reservoir Drop-Offs
Down imaging excels in deep water and along steep drop-offs. It gives a detailed view of fish, baitfish, and underwater structure directly beneath the boat. By carefully adjusting your boat position based on down imaging, you can maintain precise bait placement along the edges where fish are holding. Combining this with GPS waypoints ensures you can return to productive areas consistently.
Trolling for Walleye
Using both side and down imaging enhances trolling efficiency. Start with side imaging to locate fish schools, changes in bottom contour, or underwater breaks. Once you’ve identified promising areas, switch to down imaging to see the depth, structure, and exact location of the fish relative to your boat. This allows you to adjust your trolling speed, lure depth, and route with pinpoint accuracy, ensuring your presentation stays in the strike zone.
Bass Fishing Brush Piles
Brush piles are often dense and complex. Start with side imaging to scan a wider area and locate the piles from a distance. Once you’ve marked them, use down imaging to inspect the piles vertically. This provides precise information about fish placement within the structure and helps you position your bait or jig exactly where fish are hiding. Using both imaging types ensures every cast is intentional, maximizing your catch rate.
Which One Should You Choose?
If you’re forced to pick just one, base your choice on your fishing style:
Choose Side Imaging if you cover a lot of water, fish in shallow or mid-depth lakes, or you enjoy targeting structure and fish from a distance. Choose Down Imaging if you fish vertically, target deep drop-offs or ledges, or need clarity right beneath your transducer.
Best of Both Worlds: Combination Units
Many modern fish finders offer both side and down imaging in one unit. These combo units let you switch between modes—or even use both at once in split-screen—to maximize your effectiveness on the water.
Brands like Humminbird (MEGA Imaging+), Lowrance (Active Imaging), and Garmin (ClearVu and SideVu) provide powerful combo models that let you tailor your view to the situation. While combination units are pricier, they offer unbeatable versatility for anglers who fish a range of locations and styles.
FAQs: Side Imaging vs. Down Imaging Fish Finders
Can I use side imaging while stationary?
Yes, but image clarity suffers. Side imaging works best when the boat is moving at 2–6 mph. At rest, sonar beams don’t return consistent data.
Is side imaging worth the extra cost?
If you fish structure-heavy or shallow waters and want to cover more area quickly, side imaging is absolutely worth the investment.
How deep can side imaging and down imaging see?
Side Imaging: Effective up to 100–150 feet depth depending on model.
Down Imaging: Can reach over 250 feet deep with good resolution.
Can I see fish on side imaging?
Yes, fish appear as small dots or shadows. It takes practice to distinguish them from debris or bubbles, but once you’re familiar, it becomes a powerful tool.
Do I need GPS with my imaging sonar?
Highly recommended. GPS helps mark waypoints, track trolling paths, and return to structure spots. Most modern combo units include GPS.
What frequency is better for imaging—800 kHz or 455 kHz?
800 kHz: Higher resolution, better for shallow water and detail.
455 kHz: Better range, ideal for deeper scanning with side imaging.
Conclusion
In the side imaging vs. down imaging debate, there is no one-size-fits-all winner. Each system brings unique strengths to your boat, and understanding how they work helps you fish smarter.
- Side imaging is the tool for scanning, searching, and mapping wide underwater areas.
- Down imaging gives you the sharpest, clearest views of structure and fish directly below.
If you’re serious about improving your fishing game and can afford a dual imaging unit, that’s the best option. But even with just one, you can adapt your fishing style and tactics to make the most of what each technology offers.